This is a technical article aimed at Android developers.
This article deals with undocumented features of the Android API and derives from experimental work.
You can browse and download the sample code included in this article at http://bitbucket.org/nicobo/tweaking-android-notifications.
For SwitchDataSwitch, I wanted to provide users with a 1-click solution to enable and disable data traffic (2G/3G/...).
I chose the notification bar since it is a very accessible place, visible almost all the time and that can be expanded without stopping the running activity :
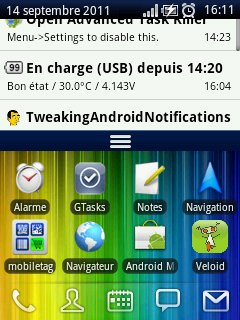
The notification bar is usually presented in its reduced form (here the dark bar at the top of the screen with the smallest icons) but can be expanded by sliding it downwards.
Unfortunately, Android's Notification API is really made for instant notifications, not persistent ones, and that implies several inconveniences :
- when creating a notification, the developer has to put an icon in the reduced notification bar, taking some precious space
- by default an 'event timestamp' is shown next to the expanded content of the notification, which means nothing for a permanent service
- there is no programmatic way to know if a notification is currently displayed or not
This article describes a way to create a notification that :
- doesn't show up in the reduced notification bar
- doesn't have a timestamp in the expanded notification bar
I haven't found a reusable way to know if a notification is currently displayed...
Creating the Notification
Let's do it step by step, by following the process of notification creation as I understand it.
Declaring the Intent and the Notification
The notification is first declared as usual (you might want to check the online reference doc) :
// The Intent that will be called upon a click on the notification
Intent notificationIntent = new Intent(context, NotifyService.class);

// Builds the notification view as it should be displayed in the end
Notification notification = new Notification(R.drawable.icon_notif, "My notification has just been displayed", 0);
Note that the icon R.drawable.icon_notif we provided to the android.app.Notification constructor is really the final one that will be displayed when the user will expand the notification bar : no trick for now.
Initializing the notification view
This is still quite standard code for Android :
// Sets the flags that will determine the behaviour of the notification
// the following tells that there is something currently running
// and places the notification in the 'ongoing' category
notification.flags |= Notification.FLAG_ONGOING_EVENT;
// the following ensures that the notification will not be removed
// if the user chooses to clear notifications
notification.flags |= Notification.FLAG_NO_CLEAR;

// Defines the notification's expanded message
CharSequence contentTitle = resources.getString(R.string.app_name);
CharSequence contentText = resources.getString(R.string.notification_text);

// Wraps our Intent with a PendingIntent instance
PendingIntent contentIntent = PendingIntent.getActivity(this, 0, notificationIntent, 0);

// Injects all the elements into the notification
notification.setLatestEventInfo(context, contentTitle, contentText, contentIntent);
On the last line, calling Notification.setLatestEventInfo(...) sets the layout of our Notification.
Now we can start tweaking it !
Note that if we were to build a more standard notification but still with no timestamp displayed next to it, we could set notification.when=0 at this point to disable the display of the timestamp.
Tweaking the notification
EDIT : Since Android Jelly Bean (4.1) you don't need the trick explained in this chapter anymore : you can hide icons from the notification bar simply by setting a priority field to PRIORITY_MIN.
This is the interesting part !
/**
 * The time of the notification rules if it is aligned to the right or left
 * of the notification bar, and therefore we use it to place the empty icon
 * where it will not be noticed by the user.
 */
private static final long TIME_HIDDEN = SDK_VERSION >= 9 ? -Long.MAX_VALUE : Long.MAX_VALUE;

// ...

// 1. After the notification's layout has been filled, we reset the time that will be used
// to place it on the edge of the notification bar in order to hide its icon
notification.when = TIME_HIDDEN;

// 2. The following line only changes the icon displayed in the notification bar when reduced.
// The icon displayed in the expanded view is still the one that was initially set.
// Together with a placement to the right (or left depending on the SDK version), it hides the icon.
notification.icon = R.drawable.icon_hidden;

// 3. Triggers the notification.
NotificationManager mNotificationManager = (NotificationManager) getSystemService(Context.NOTIFICATION_SERVICE);
mNotificationManager.notify(MYNOTIFS_1, notification);
// After that, we cannot tell about the state of the notification...
It is very important to place this code after the call to Notification.setLatestEventInfo(...), to make sure that the notification's view has already been built.
The magic happens in two steps :
- we move the icon to the edge of the bar so that it doesn't take some place between 2 other icons
- we replace the original icon with a transparent 1x1px icon (R.drawable.icon_hidden)
The first step simply implies defining a fake timestamp that will be the greatest (Long.MAX_VALUE) or the smallest possible one (-Long.MAX_VALUE) so that the icon will be placed before of after any other icon (that has a reasonable timestamp). To know which value to use, we must test the SDK version.
The other step is to replace the icon with a transparent one, making it invisible to the user. We simply used a transparent PNG image.
The best part is that the icon we used to build the Notification is still there when the notification bar is expanded, it is not replaced with the transparent one...
The last lines are standard Android code that trigger the notification.
Et voilà !
Some more details
Note : each of the following cases is included with the sample app attached to this article.
Playing with the timestamp
If you are curious, you might want to see what happens if you set Notification.when = TIME_HIDDEN before calling Notification.setLatestEventInfo(...) :
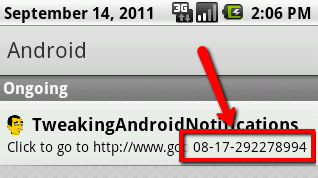
This date is very long and has no meaning for us...
If you don't change Notification.when at all, the icon is placed depending on its creation time (notifications are sorted on their timestamp) :

There is an empty place between two icons of the notification bar : this is our transparent icon.
In general, if you want to have more control on the date displayed next to the notification text, simply set the when field right before calling setLatestEventInfo(...).
An alternative
Finally, instead of building a default view for the notification and then tweaking it, we could build a custom notification view.
// The following code makes uses a custom layout for the notification.
RemoteViews contentView = new RemoteViews(getPackageName(), R.layout.notification);
contentView.setImageViewResource(R.id.image, R.drawable.icon);
contentView.setTextViewText(R.id.title, contentTitle);
contentView.setTextViewText(R.id.text, contentText);
notification.contentView = contentView;
notification.contentIntent = contentIntent;
There is some documentation about this cool option, but be aware that this could easily lead to build views that are not consistent with the OS' default style...
Even though it allows us to hide the timestamp in the expanded view, it doesn't help hiding the icon in the reduced notification bar, so in our case this option is not quite helpful...
Also, I could not make it work on Android 1.5 (I neither tried nor investigated further).
End note
Don't forget this is experimental work, and the method described in this article may not be available on all devices, and could be deprecated as well in future releases of Android.
However, the app I've created based on this article has already been installed on several kind of devices without issue so you may be confident for now... I'll update this article whenever I have feedback about it.
Happy notifying !
References
 Me on Twitter
Comments
Post new comment